

Paxton Net2 Access Levels and Timezones
Paxton

The Access Level is at the heart of Net2. Each one defines the relationship between the doors and the times when a user has access through them.
When you set up a user's record, you select the access level that is applicable to them. With a possible 250 access levels, all combinations can be catered for.
Timezones are used to define the time periods and are discussed later in this application note.
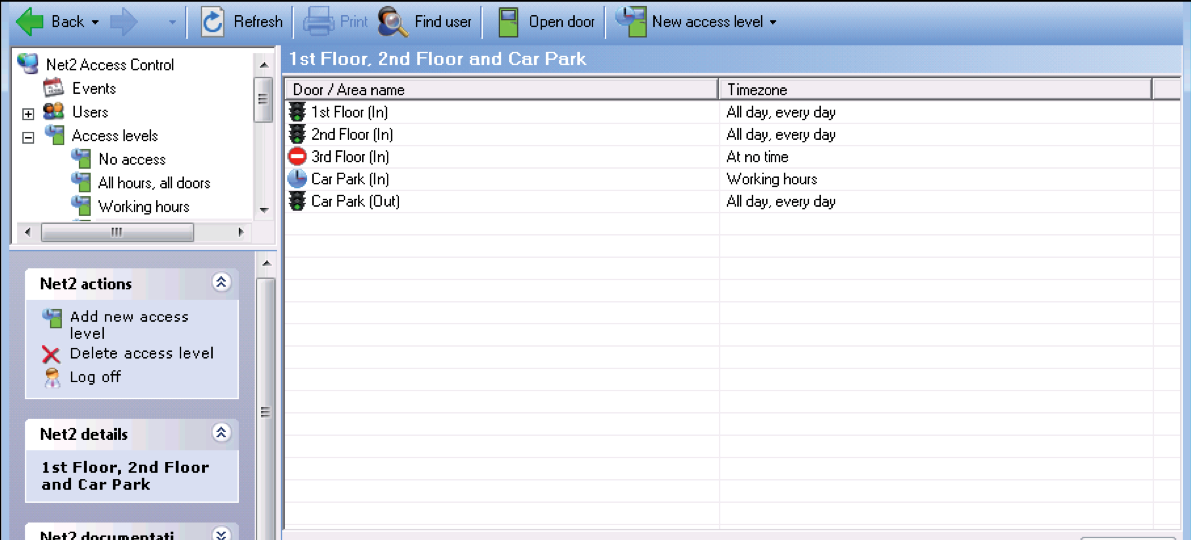
In the above example we see an entry in the table for every reader that has been enabled. The Car Park ACU has both In and Out readers installed and so this 4 door system has a total of 5 entries. Alongside each entry is the timezone that defines when this reader is active and users who are assigned this access level will use these reader restrictions.
The three timezones used here (All day, every day / At no time / Working hours) are already set up as defaults in the software. You can modify the Working Hours timezone if required.
We have allowed full access to the 1st & 2nd floors, restricted the access to using the Car Park and denied access to the 3rd floor. By naming the access level with its description, it makes it easy to assign the correct one to a user as its name will display in the user record in a drop down menu for easy selection.
A basic system could be configured with these default timezones in different door combinations.
NOTE: It is usually good practice to set Out readers to All day/every day to avoid locking people on site after
work.
When deciding what access levels are required, you should determine how the system will be used by the customer in the future.
A site manager will easily relate to the physical layout of the building.
Example names: 1st Floor only, 1st Floor, 2nd Floor & Car Park. This makes it easy to upgrade a user from one to the other just be selecting the new level in their user record.
A personnel department may be better suited to defining access levels by user/job type.
Example names: Accounts Dept, IT staff, Cleaners, etc. These will often give access through the same doors but they will have different timezones.
You can use either style or a mix of both as required. Examples of both appear in this document.
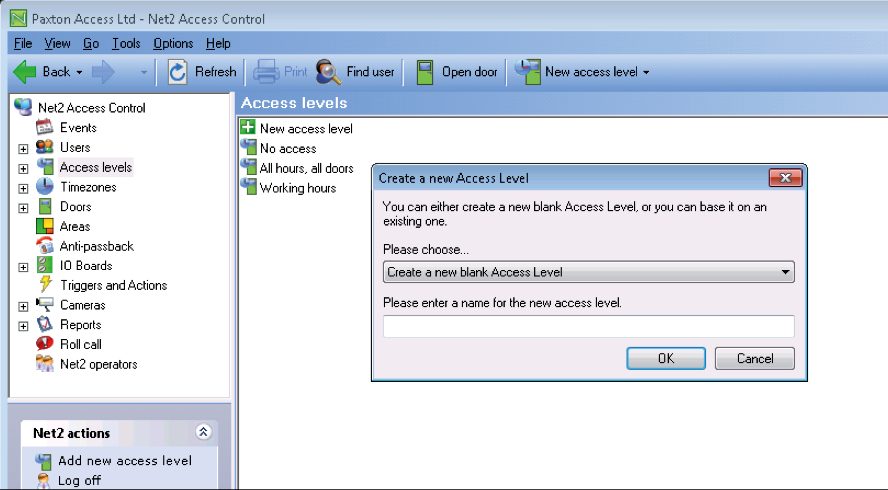
To add a new access level, click on Access levels in the tree view and then New access level.
You now have the option to create a new blank access level with all timezones and all readers set to At No Time, or you can use one of the existing access levels as a template. This is helpful if there is a large numbers of doors on a system and this new level only differs slightly from an exisiting one.
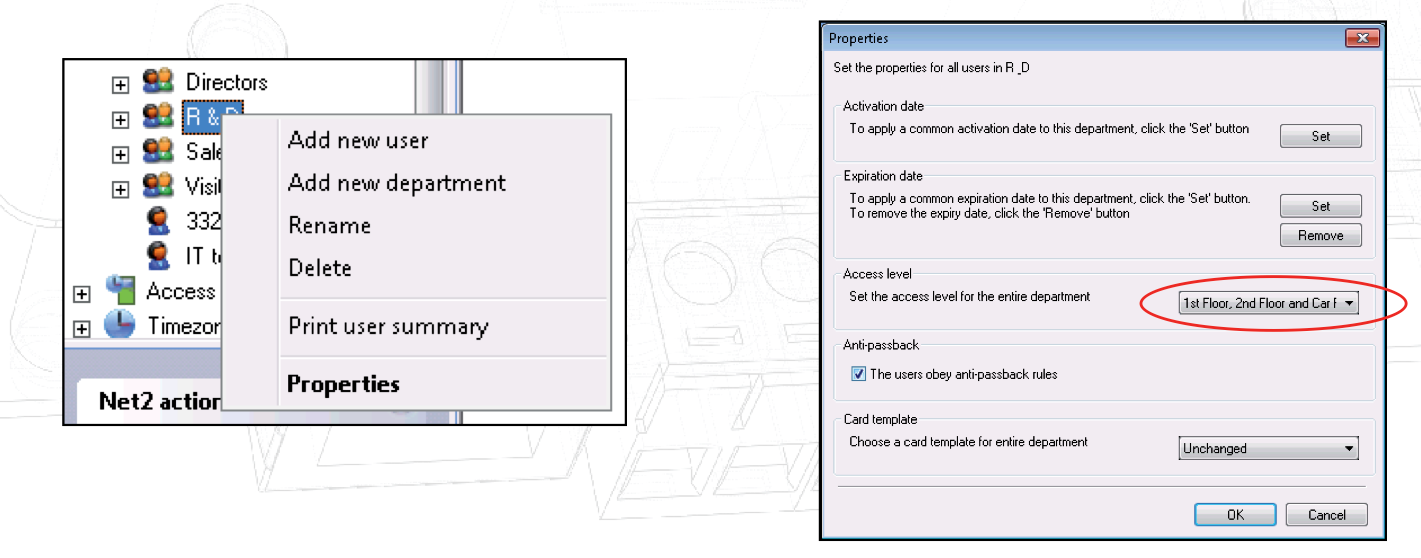
You can set the access level for all people in a department by right clicking on the department in the tree view, and selecting Properties.
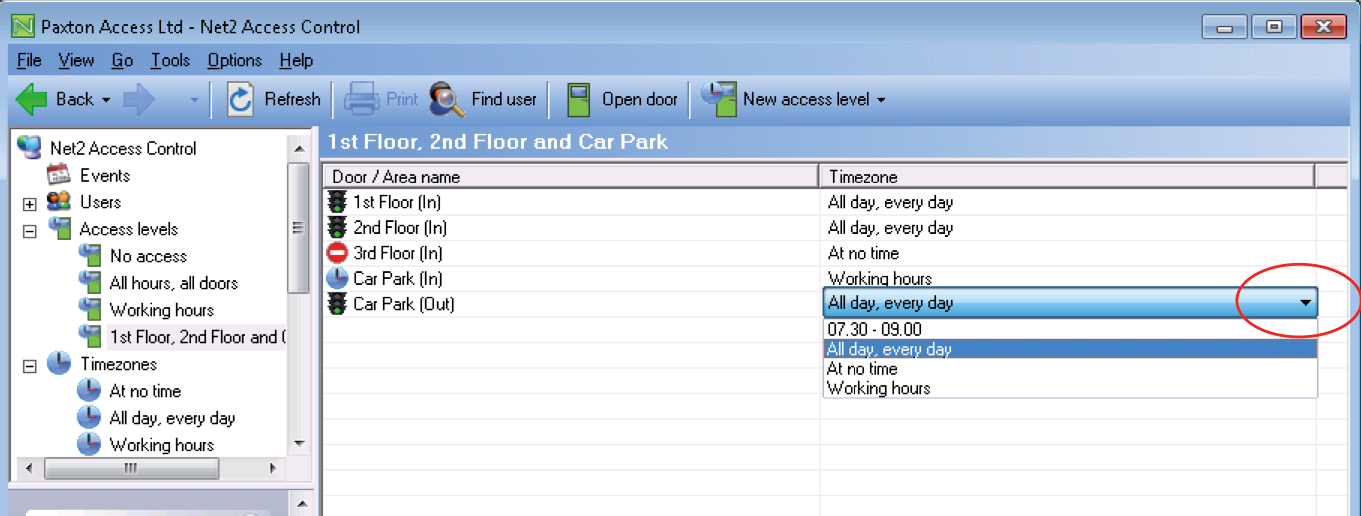
Once the basic level has been created, you can then select the timezone by clicking directly on the timezone entry (right hand column) and activate the drop down menu of available timezones.
The Net2 system makes use of timezones in functions that depend on the time and day of the week. Once a timezone has been set up, it can be used for any number of features that need to be active during the defined time period. The maximum number of timezones is 64.
Their main use is in Access levels to define active time periods but they can also control system functions, like opening the main gates during working hours.
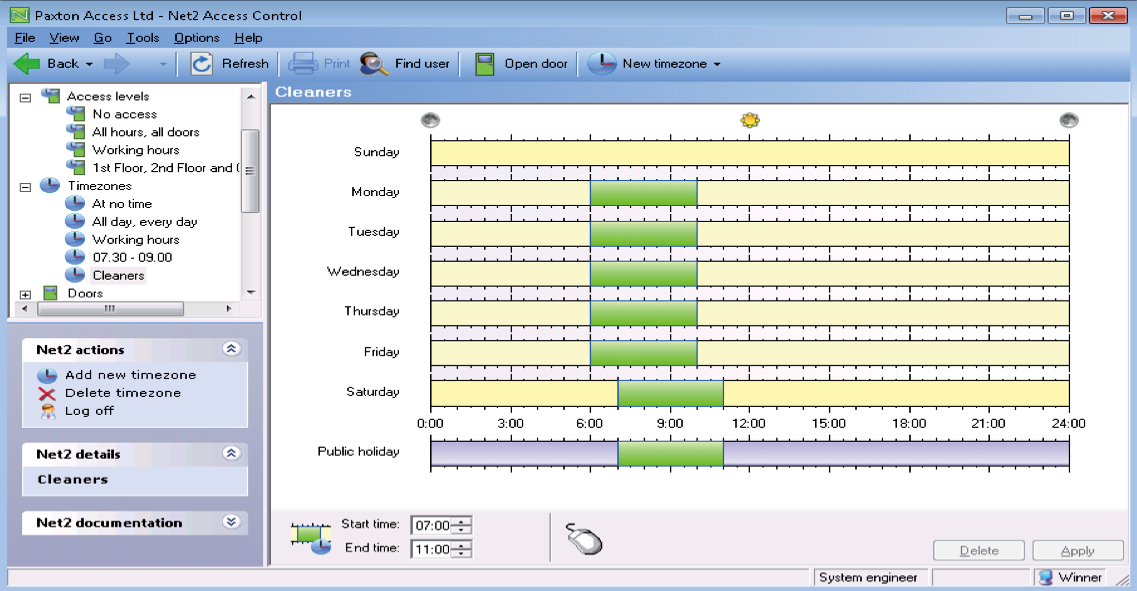
A timezone is made up of several timeslots. An example is shown below for a Cleaner.
Sunday - No Time
Monday - Friday - 6am to 10am
Saturday - 7am to 11am
Public Holidays - 7am to 11am
Timezones can have several timeslots per day allowing for break times, evening classes, etc. The maximum number of timeslots per timezone is over 2000.
New Timezones are created in the same way as Access levels. Click on Timezones in the tree view and New timezone.
New timeslots can be added by putting the mouse pointer on the required day at the start time, click and hold the left mouse button while dragging the pointer to the end time.
Note: The values also display in the time window at the foot of the page.
Timezones can be deleted by clicking the 'Delete' button.
Timeslots can be deleted by first selecting the timeslot and pressing the 'Delete' button.
Timeslots can be moved by dragging and dropping. Select the timezone by holding the left mouse button down and moving the pointer whilst the timeslot is selected. The start and end times of a timeslot can be adjusted to the nearest 15 minutes by dragging the end of the timeslot.
These appear in the bottom left hand corner of the main display window. When a timeslot is selected the start and end times are displayed. The timeslot can be adjusted to the nearest 1 minute using up and down arrows.
Clicking on the right mouse button whilst a timeslot is selected will activate cutting, copying and pasting. An entire sequence of timeslots in one day can be copied using the copy day feature.
As well as the 7 days of the week, there is an entry for public holidays. This allows specific timeslots to be set up for days that are nominated as public holidays. By default, this is left blank so that any days defined as public holidays will not allow access. (except All day, every day)
In the previous example, the Cleaners timezone has been set up to allow access to the premises between 7am and 11am on public holidays.
Changes must be applied for them to be added to the database and become active immediately.
As with Access levels, choosing the name you give them will make future programming much easier. As the name of each timezone appears in the access level alongside its reader it may be better to use a description (e.g. Mon-Fri : 06:00 - 18:00) rather than the user (Cleaner).
If you use the time of day (07:30 - 21:00) then clearly you should not modify the timezone in future but create new ones (07:30 - 23:00) should the need arise. However if you have created a Cleaners timezone, only users with access levels linked to the Cleaners timezone will be changed.
It is always a balance that you will need to decide during installation, although names can be changed at any time in the future.
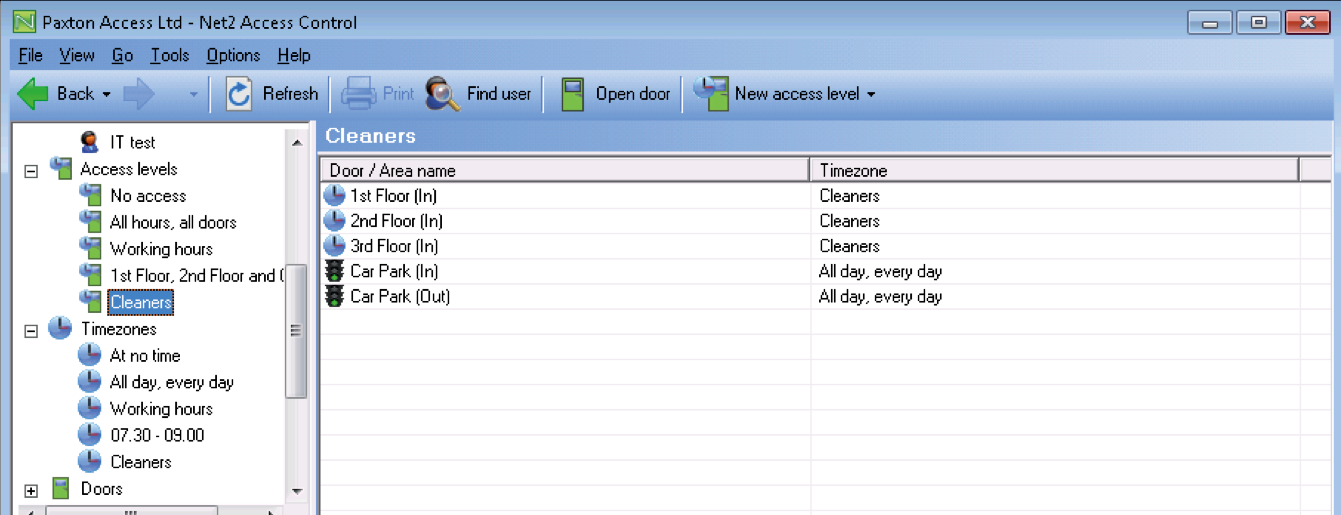
We can now use this Cleaners timezone to define a Cleaners Access level that limits their building access but gives them 24 hour access to the car park to deliver materials etc.
Below we see the user's record that also displays the access level. The level assigned is set up on this screen.
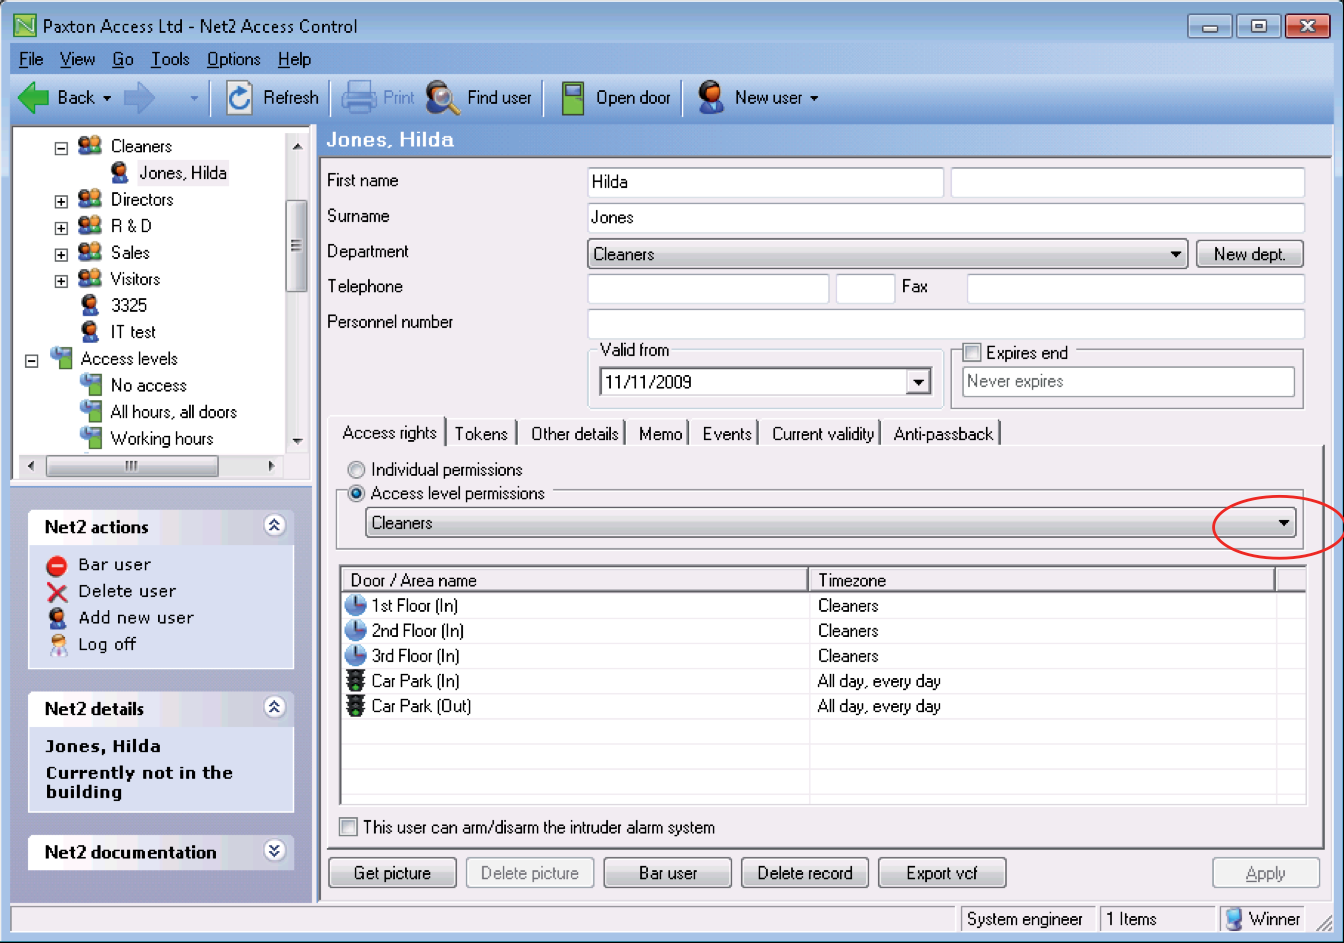
It is possible to create a User record with its own Access level by selecting Individual permissions. Assigning a Timezone to each reader is the same as for a normal Access levels.
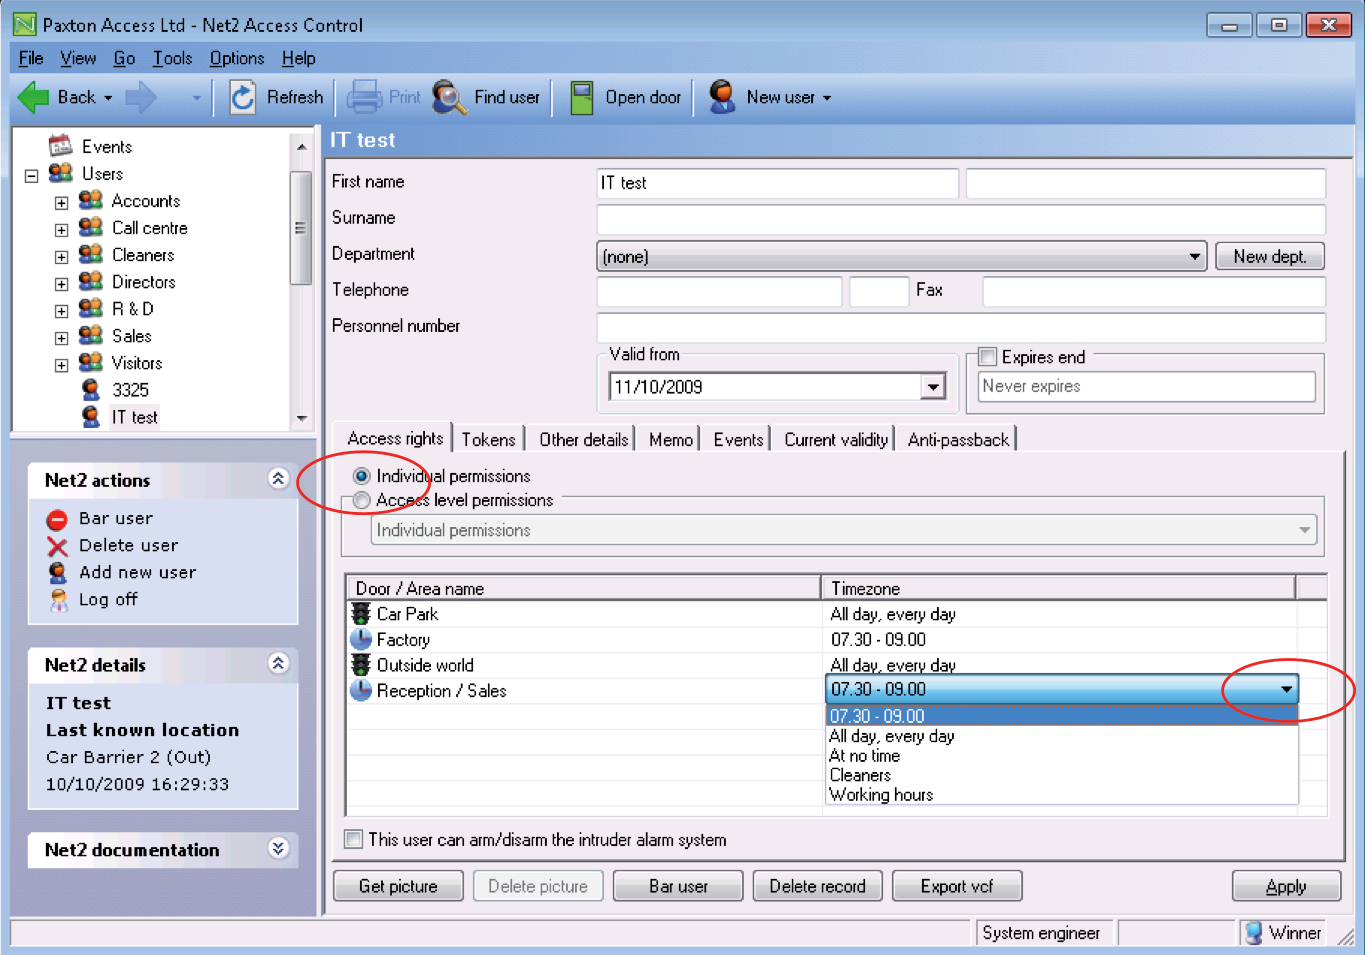
This option should only be used for Emergency/Test situations where a normal access level would take time to create and assign. Their use should be kept to a minimum.
Individual permission levels do NOT show in the Access level tree view and are therefore much more difficult to trace and control.
It is far better to create an Access level for one user (e.g. Directors Assistant) than to create a user record with 'hidden' permissions. These individual records will all need to be updated when doors/readers are added to the site and may get forgotten.
NOTE: In the above example, areas have been used in the software which can combine several doors. Only one entry per area is required, thus reducing the number of things to configure. See AN1023 : Configuring areas and area groups < http://paxton.info/978 >
At All Secure, we are dedicated to delivering superior service; enabling our clients to trust us and recommend us to others.


